V-3.11.0
Introduction
This document describes the prerequisites, requirements, and installation tasks for the True-Xtender RA DCOM service. The True-Xtender Registration Authority DCOM service enables Windows and other clients to use the DCOM protocol for Cross Forest certificate enrollment or to use the RA DCOM service as a Proxy in front of the Microsoft CA.
DCOM Components
The true-Xtender Registration Authority provides the following subcomponents that are required if the DCOM interface is used. These components can be enabled by configuration on the RA. An additional license (RA-DCOM) is also required.
-
true-Xtender RA with enabled WCCE Web Service
The WCCE web service gets installed with the True-Xtender Registration Authority basic installation. This web service interface must by license and is used by the true-Xtender RA service only.The installation of the True-Xtender RA basic component is documented in [TXRAInst]. -
true-XtenderTXRADCOMWindowsService
The DCOM Windows service TXRADCOM is installed separately on the same or a different server as the True-Xtender RA basis installation. This service implements the following Microsoft interfaces:Microsoft WCCEMicrosoft ICertPassage
Abbreviations
| CA | Certification Authority |
|---|---|
| CRL | Certificate Revocation List |
| DCOM | Distributed Component Object Model |
| DN | Distinguished Name |
| FQDN | Fully Qualified Domain Name |
| MS PKI | Microsoft PKI (Active Directory Certificate Services) |
| SAN | Subject Alternative Name |
| TXRADCOM | True-Xtender Registration Authority DCOM Service |
| WCCE | Windows Client Certificate Enrollment |
Document conventions
This document uses variables which must be replaced by the customers’ values. Variables are marked with <> and written bold/italic.
| Variable | Customer sample value |
|---|---|
| <TXRA> | RADB01 |
Sample command text is marked in grey:
certutil -dump sample.pfx
TXRADCOM Service Update
To update an existing installation of TXRADCOM Service, follow the steps below. Before proceeding, make sure the current setup is running fine (e.g. by checking Event Log entries and TXRADCOM log files).
Update Steps
Backup Configuration
- BackupTXRADCOM Script Parameter
Open PowerShell as Admin and run the following command to create a backup of the configuration ini files.
$ScriptsPath = ``"$($env:ProgramFiles)\keyon\trueXtenderRADCOM\scripts"$BackupPath = "$($env:temp)\RADCOMBackup.zip"

cd $ScriptsPath

ls $ScriptsPath | Where-Object Extension -eq '.ini' |Compress-Archive `-DestinationPath $BackupPath
Stop Service
- StopTXRADCOM Service
Run with administrative privilegesnet stop trueXtenderRADCOM
Update TXRADCOM Service
- Update TXRADCOM Service
Run the TXRADCOM installer as local administrator.
true-XtenderRADCOM_*.exe
Choose to update the existing installed product
Restore Configuration
- BackupTXRADCOM Script Parameter
Run with administrative privileges.
$ScriptsPath = `"$($env:ProgramFiles)\keyon\trueXtenderRADCOM\scripts"$BackupPath = "$($env:temp)\RADCOMBackup.zip"
Expand-Archive -Path $BackupPath `-DestinationPath $ScriptsPath -Force
Set DCOM Permissions
Perform the following steps on the TXRADCOM server.
- Set DCOM permissions
Execute the PowerShell script with administrative privileges& "$ScriptsPath\\Configure-RADCOMLocalPermissions.ps1"This configuration script performs the steps as described in appendix 6.2
Start Service
(if not already started)
7. Start TXRADCOM Service and ensure service is set to automatic
Run with administrative privileges.
net start trueXtenderRADCOM
sc.exe config trueXtenderRADCOM start= delayed-auto
TXRADCOM Service Installation
Prerequisites
True-Xtender RA is installed into an Active Directory environment. The following components are required.
| Component | Description |
|---|---|
| True-Xtender RA | True-Xtender RA (version 3.8.x) installed. |
| Windows Server (DCOM server) | A domain joined Windows server running one of the following Windows Versions: Windows Server 2016, 2019, 2022 Note: The TXRADCOM service cannot be installed on a server with an installed Microsoft CA. |
| TXRADCOM service account | DCOM service account used to authenticate against the RA WCCE web service Interface. |
| True-Xtender RA WCCE Web Service AD Group | Active Directory group with DCOM service account as member. This group will be granted access to the WCCE web service interface of the True-Xtender RA web application. |
| TXRADCOM service account certificate | TXRADCOM uses a client certificate to authenticate against the Registration authority. Certain requirements must be met to make certificate-based domain authentication work. Refer to document Certificate Based Domain Authentication Guide for Certificate-based domain authentication requirements. A Certificate with EKU “Client Authentication” which is added into the Local Computer Store on the server, where the RA-DCOM service is installed. |
| TXRADCOM Clients AD Group(s) | Active Directory group for users who shall enroll certificates of specific certificate types via the TXRADCOM service. This group exists in the foreign domain. |
| .NET Framework 4.8.0 (or higher) | On the TXRADCOM server (see http://www.microsoft.com/de-ch/download/details.aspx?id=42642) |
| PowerShell 5.1 (or higher) | On the TXRADCOM server (see https://www.microsoft.com/en-us/download/details.aspx?id=40855) |
| Enterprise Admin Permissions | Enterprise Administrator permissions are required for the installation. |
Microsoft CA configuration
For Auto-Enrollment scenarios, where the DCOM service is used directly by Clients, the Keyon True-Xtender Standalone Policy Module (TXPMSA) or at least the “True-Xtender Autoenroll Policy Module” is required on the MS CA, if the Subject Name and/or the Subject Alternative Name are created based on the AD information of the Caller (User or Computer object), due to the fact that the “CertEnrollmentClient” provides no Subject DN in the CSR.
True-Xtender Autoenroll Policy Module
The certificate template used for Autoenrollment must be activated on the Microsoft CA as shown below.
Open the Microsoft CA management console and navigate to the tab “Policy Module”. Navigate to the certificate template used for the Enrollment and Click “Edit”.
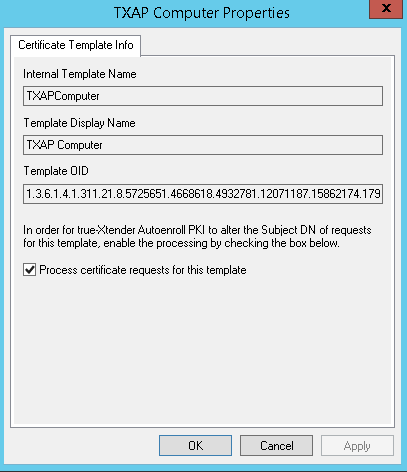
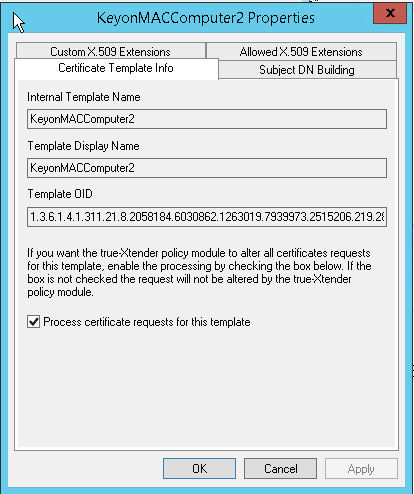
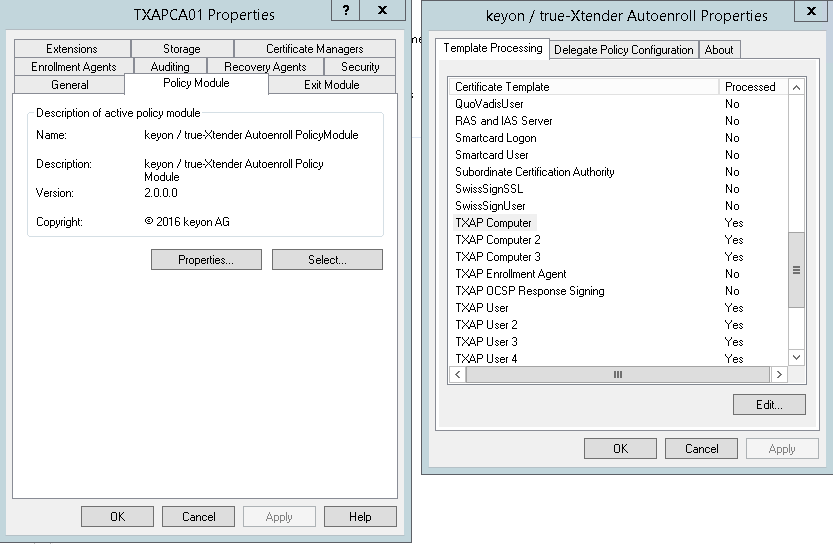 The flag “Process certificate requests for this template” must be selected in the tab “Certificate Template Info”.
True-Xtender Policy Module
The True-Xtender Policy Module on the Microsoft CA must be configured as described in this chapter.
Open the Microsoft CA management console and navigate to the tab “Policy Module”. Click “Properties”, then navigate to the certificate template used for the enrollment and Click “Edit”.
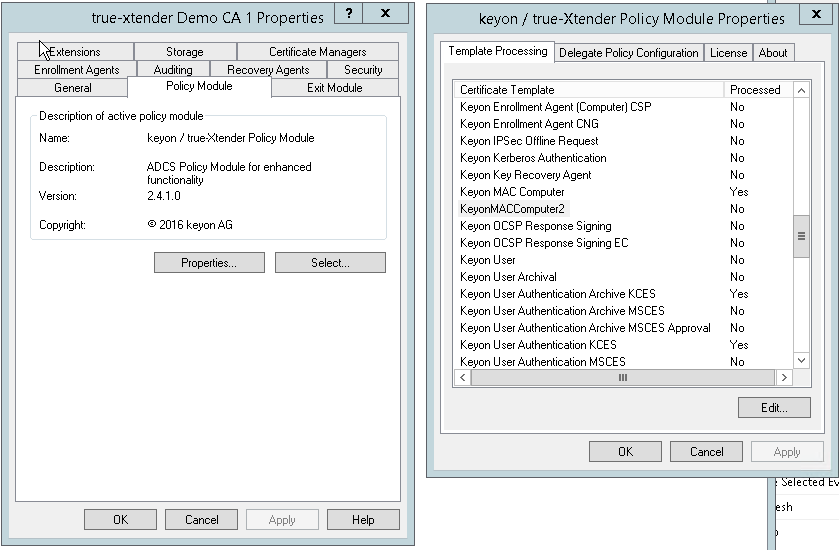 The flag “Process certificate requests for this template” must be selected in the tab “Certificate Template Info”.
 In the tab “Subject DN Building”, insert the variable:
<RequestAttribute(trueXtenderAutoenrollSubjectDN)>
as shown below.
In the tab “Subject DN Building”, insert the variable:
<RequestAttribute(trueXtenderAutoenrollSubjectDN)>
as shown below.
 Close all the dialogs and restart the Microsoft CA.
True-Xtender RA configuration
WCCE Service configuration (web service used by RA-DCOM)
Configure TLS client auth in IIS settings
- IIS: Root node (server name): Sites: RegistrationAuthority3: ws: click on Content View (at the bottom of the middle pane)
- Select WCCE.svc: Switch to Features View
- Select Authentication Module
- Enable Anonymous Authentication
- Go back and select SSL settings
- Enable Require SSL and for client certificates select Require
Check WCCE section in web.config
The bodystyle in the Endpoint behaviour web element must be set to “Wrapped”.
<behavior name="web">
<!--message behaviour and output format-->
<webHttp defaultOutgoingResponseFormat="Json" helpEnabled="true" defaultBodyStyle="Wrapped" />
</behavior>
Prepare Application Settings
The permission to use the WCCE web service of the True-Xtender RA must be assigned to the service account of the DCOM service. For TLS client auth, to enable Client Cert mapping from SAN UPN: IIS: Root node (server name): Authentication: enable “Active Directory Client Certificate Authentication” (don’t enable via Configuration Editor).
Configure Certificate Profiles
Create a certificate profile for the DCOM clients and configure as outlined below. The RA-DCOM supports the following scenarios:
- Creation of DN based on CSR submitted by MDM or other tools
- Creation of DN based on Active Directory Information from caller
DN based on CSR (Mobile Device Management)
The certificate profile must not contain any extension attributes.
DN based on Active Directory Information (Microsoft Auto-Enrollment)
The certificate profile must contain the information about the creation of the DN and the SAN. Therefore, so called “Extension attributes” must be defined on the certificate profile.
 Subject Name
To define the DN, an extension of type “Custom” must be defined:
Subject Name
To define the DN, an extension of type “Custom” must be defined:
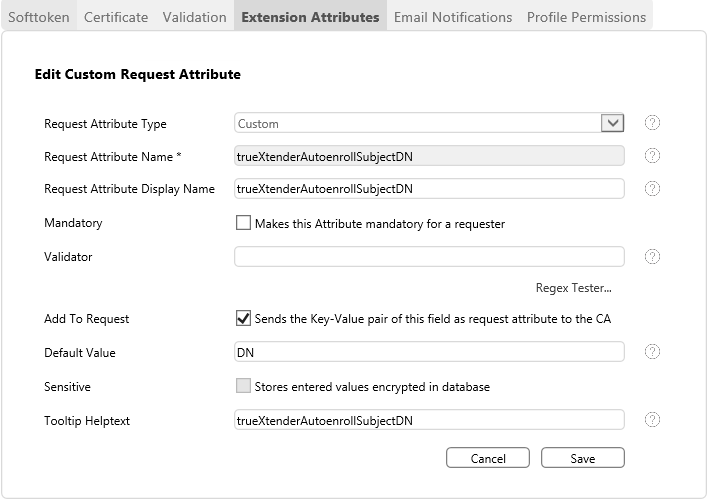 The “Request Attribute Name” must be set to “trueXtenderAutoenrollSubjectDN”. The value trueXtenderAutoenrollSubjectDN is a fixed keyword in Registration Authority.
The Flag “Add to Request” must be set.
The “Default value” defines the content of the DN which can be one of these:
The “Request Attribute Name” must be set to “trueXtenderAutoenrollSubjectDN”. The value trueXtenderAutoenrollSubjectDN is a fixed keyword in Registration Authority.
The Flag “Add to Request” must be set.
The “Default value” defines the content of the DN which can be one of these:
- “CN” for AD account attribute ‘cn’
- “DN” for AD account attribute ‘distinguishedname‘
- “DNS” for AD account attribute ‘dnshostname‘ (commonly used for Domain Controller)
Subject AlternativeName To define the SAN entries, an extension attribute of type “Subject Alt Name” must be defined on the certificate profile. Supported types are:
- “dNSName” for AD account attribute ‘dnshostname’
- “upn” for AD account attribute ‘userprincipalname’
- “rfc822Name” for AD account attribute ‘mail’
Important:
-
Each RA DCOM Access Role MUST only have Re-quest Permissions assigned to a SINGLE certificate profile using the same certifi-cate template. Reason for this: To identify the Certificate Profile to use for a request, the template of each profile which is assigned to the RADCOM account is searched for (in this order):
- if provided, the OID of the Certificate Template Info (szOID_CERTIFICATE_TEMPLATE 1.3.6.1.4.1.311.21.7) extension of the CSR (typically with Windows Certificate Enrollment including Windows Certificate Autoenrollment)
- if provided, the template name of the Certificate Template Name (szOID_ENROLL_CERTTYPE_EXTENSION 1.3.6.1.4.1.311.20.2 extension.
-
The OID and the name of the created certificate template in the foreign domain must exactly match the certificate template in the target domain.
-
If the certificate is used as OCSP signer and the OCSP auto-enrollment is imple-mented, make sure the template Major Version and Minor Version are the same for the template in both domains, otherwise OCSP auto-enrollment requests a certificate every 8 hours since it assumes the template has changed.
-
Do not use the same certificate template for multiple certificate profiles. For the DCOM service resp. the DCOM service account and the DCOM clients always use different certificate templates for different certificate profiles. Otherwise, the RA cannot assign the correct certificate profile to the certificate because request only contains the certificate template information but no certificate profile information.
-
“Certificate Profile Name” and “Template name” must NOT have spaces and need to be equal to the certificate template.
-
The OID and the name of the created certificate template in the foreign domain must exactly match the certificate template in the target domain.
-
Is the certificate is used as OCSP signer and the OCSP auto-enrollment is implemented, make sure the template Major Version and Minor Version are exactly the same for the template in both domains, otherwise OCSP auto-enrollment requests a certificate every 8 hours since it assumes the template has changed.
SID Extension RADCOM submits the Object SID of the requester as request attribute. If it should be used to create certificate SID extension (See the following link for details: https://support.microsoft.com/en-us/topic/kb5014754-certificate-based-authentication-changes-on-windows-domain-controllers-ad2c23b0-15d8-4340-a468-4d4f3b188f16) , it must be configured as Custom Attribute. Add an extension of type “Custom”: The “Request Attribute Name” must be set to “strong_mapping_sid”. The Flag “Add to Request” must be set. The “Default value” left empty. The CAConnectorADCS (up from Version 1.3.0) then automatically create a SID extension in the request (works for offline attribute), additionally a request attribute is forwarded to the CA (for online templates, the Policy Module must be configured to create an SID extension on this attribute value.
Configure RA Role and AD Groups
Configure new a RA role (“RA DCOM Access”) as follows: RA-Permissions:
- Access DCOM Interface
- Issue Certificates
- Optional, depending on usage: Revoke Certificate
Certificate Profile Permissions (for each certificate profile required):
- Read
- Request
If there are multiple certificate profiles to be issued via RADCOM, specific roles can be created for the DCOM service account assigned with ALL certificate profiles and for each DCOM client assigned with the specific certificate profile. Configure new AD Groups and assign above RA role for:
- DCOM Service account
Permissioned via AD group[TXRA_DOMAIN]\[GROUP_NAME]The Service account is identified by its client certificate (configured in RADCOM).
If there are multiple certificate profiles to be issued via RADCOM, this AD group for the service account must be assigned to a role with ALL certificates profiles. - DCOM clients (TXRADCOM Clients AD Group)
Permissioned via AD group[TXRA_DOMAIN]\[GROUP_NAME]These groups must be configured in TXRA, without any roles assigned.
Breaking change: Up to Version 8.3.4 it was optional to assign this role to the DCOM clients group.
If there are multiple certificate profiles to be issued via RADCOM, this AD group for each DCOM client can be assigned to a specific role with the specific certificates profile.
Installation Steps
Important Notes
- Whenever the TXRADCOM service is re-installed, the DCOM permissions must be set again according to section Set DCOM Permissions
- If there is a GPO (Group Policy Object) restricting the execution of scripts (e.g. "AllSigned" execution policy), the digital certificate of the installer signature must be present in the Trusted Publishers for the installer execution to succeed. This can be achieved by the following instructions: In Windows Explorer, select properties of the installer file true-XtenderRADCOM_*.*.*.exe, switch to tab "Digital Signatures", select the Signer, click "Details", - "View Certificate" - "Install Certificate…", select "Local Machine", click "Next", select "Place all certificates in the following store", click "Browse", select "Trusted Publishers", click “OK” - "Next" and "Finish".
- If TXRADCOM is installed without further configuration, access to other CAs from this server will fail with “The RPC server is unavailable” error. Make sure DCOM permissions are set correctly according to section Set DCOM Permissions and reboot the server.
Connectivity Checks
Perform the following steps on the TXRADCOM server.
- Import Client Cert
Import the certificate into the user store for testing purposes. - Check WCCE access
Start a web browser.
Enter the WCCE web service interface URI:https://<*ra-host*\>/ws/WCCE.svc
Install the SSL Client certificate for the DCOM Service account
Import the certificate in Local Computer store because the DCOM service runs under “Local System”.
Install TXRADCOM Service
- Security
Add “Authenticated Users” group to the local group “Certificate Service DCOM Access” on the server, where the RA-DCOM service is installed. - Install TXRADCOM Service
Run the TXRADCOM installer as local administrator.true-XtenderRADCOM\_\*.exe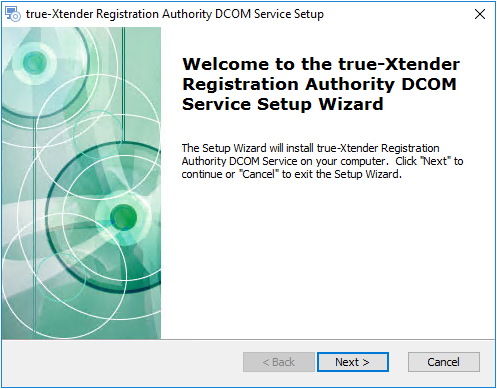
Create TXRADCOM Clients AD Group
- Create TXRADCOM Clients AD Group
Create an AD group for users/computers who shall get certificates via the TXRADCOM interface.
This AD group must be created in the foreign domain (for cross forest scenarios).
The AD group must then be configured in the TXRA (without any roles assigned).
Create AD Certificate Template
MS CA domain
The following steps must be performed in the domain where the RA and the Microsoft CA are running.
- Create AD Certificate Template
Create an AD certificate template with the same name as specified in section Configure Certificate Profiles.
Important Notes:
If an MSCA in the same domain or AD forest is used, the issuance requirement "This number of authorized signatures is required" cannot be used. Otherwise a DCOM client would want to select a signing certificate during certificate enrollment.
Foreign domain
The following steps must be performed in the domain where the RA-DCOM service is installed. If TXRA-DCOM does not run in the domain where the RA and the Microsoft CA are running, the used certificate templates must be exported in TXRA domain and imported in the foreign domain.
Domain Administrator permissions are required to start the scripts.
The scripts make use of ldifde.exe: Ldifde is a command-line tool that is built into Windows Server. It is available if you have the AD DS or Active Directory Lightweight Directory Services (AD LDS) server role installed.
In case true-CA is used: TXRA reads the TemplateName from CSR from request via the Certificate Template OID, this mieans, the CertTemplate must exist with this OID in the RA. Since the Template properties come from true-CA, the true-CA Cert Profile OID must match with the OID from the CertTemplate in AD.
-
Export
(from source domain, the scripts must be copied from the foreign domain server to the source domain server)
Specify the Certificates Templates which should be exported and the export directory in the configuration file:C:\\Program Files\\keyon\\trueXtenderRADCOM\\scripts\\Export-Templates.ini -
Set ExportDir parameter
ExportDir=<*Directory*\>
Existing directory where to export template data.
Example:ExportDir*\=*C:\\Install\\RADCOM\\Export -
Set DomainDN parameter
DomainDN=<Base Domain DN>
Distinguished Name of the domain to get the templates.
Example:DomainDN=DC=TRUE-XTENDER,DC=KEYON,DC=TEST -
Set TemplateNames parameter
TemplateNames=<Template Name>
Semicolon separated list of names (name, not displayName) of the Certificate Templates names to export into ExportDir.
Example:TemplateNames=Webserver;ClientAuth -
Execute export script
Execute the PowerShell scriptC:\\Program Files\\keyon\\trueXtenderRADCOM\\scripts\\Export-Templates.ps1
This script exports the defined templats as LDIF files into the export directory -
Copy the created files to the RA-DCOM server in the foreign domain.
-
Import (into target domain)
Edit the configuration file:C:\\Program Files\\keyon\\trueXtenderRADCOM\\scripts\\Import-Templates.ini
Start the script:C:\\Program Files\\keyon\\trueXtenderRADCOM\\scripts\\Import-Templates.ps1 -
Modify Template (on target domain)
- Subject Name: Set to “Build from Active Directory”
- Issuance Requirements: Set to “no signatures”
- Security: Modify accordingly (Enroll/Autoenroll for TXRADCOM Clients AD Group)
Create TXRADCOM AD Enrollment Service
Perform the following steps on the TXRADCOM server. Notes:
- The script can be executed multiple times to update the settings “CACertPath” or “CertificateTemplates”.
- If the enrollment service needs to be deleted, use the MMC Snap-in “ADSI Edit” to delete the service located at:
CN=<*TXAP-Internal-CA-Subject-CN*\>,CN=Enrollment Services,CN=Public Key Services,CN=Services,CN=Configuration,DC=...,DC=...
-
Open INI file
Open the fileC:\\Program Files\\keyon\\trueXtenderRADCOM\\scripts\\InstallationParameters.ini -
Set CAName parameter
CAName=<TXRA-DCOM-CA-Name>CAName is the name which is used for the RA DCOM CA service. Note: In case CES (Certificate Enrollment Service) will be configured for that DCOM CA, be aware the wizard tries to set the EnrollmentServerURL on the Enrollment Service with the name that is built from the CN of the CA certificate and not from the Name of the Enrollment Service (=CAName configured here). This means, in case the CAName of the Enrollment Service is different than the CN of the CA certificate, the wizard will report an error stating it could not set the EnrollmentServerURL, but it will still complete. EnrollmentServerURL must then be set manually. -
Set CADomainName parameter
CADomainName=<Fully Qualified Domain Name>CADomainName is the fully qualified domain name where the TXRADCOM server is joined to. Example:CADomainName=TRUE-XTENDER.KEYON.TEST -
Set CACertPath parameter
CACertPath=<Path to CA certificate>CACertPath is the path of the binary or Base64 encoded CA certificate file containing the target CA certificate. -
Set CertificateTemplates parameter
CertificateTemplates=<list of template names>Semicolon separated list of names (name, not displayName) of the Certificate Templates names that the TXRADCOM enrollment service should support. Example:CertificateTemplates=Webserver;ClientAuth -
Execute configuration script
Execute the PowerShell scriptC:\\Program Files\\keyon\\trueXtenderRADCOM\\scripts\\Configure-RADCOMEnrollmentService.ps1with Enterprise Administrator privileges. This configuration script performs the steps as described in appendix TXRADCOM Enrollment Service Configuration Script
Configure TXRADCOM Service
Update the TXRADCOM service configuration file.
-
Open Configuration File Open the configuration file located in the bin subfolder of the TXRADCOM installation folder. Example: "C:\Program Files\keyon\trueXtenderRADCOM\bin\trueXtenderRADCOMService.exe.config"
-
Change Logging Configuration Logging is implemented with Log4Net and can be changed accordingly. The logging is configured within the
<log4net>tag in the configuration file. -
Change Startup Configuration The TXRADCOM service uses caching for better performance. With the settings PingTXRADuringStartup and
FillCacheDuringStartup, the cache gets filled during startup with information the service gets from the True-Xtender RA. The setting SubmitClientRequestAttributes turns off forwarding Client Request Attributes (default is false). Relevant for non Auto-Enrollment scenario (=request has no cert template info or profile has no subject/subject alt name name param)
The setting FailoverConnectionCheckPeriodSeconds is optional and only used with failover configurations (multiple client endpoints configured to different RA instances) and defines the time for connection checks (default 300).
Optional settings: Setting NetBiosName adds the configured value as SAN DNS if requester is in role Domain Controller. Setting SanValueDomainFQDN adds the configured values (semicolon separated list) as SAN DNS if requester is in role Domain Controller. Setting DcSanDnsForAny to true applies the settings from NetBiosName and SanValueDomainFQDN regardless if requester is in role Domain Controller (for testing purposes). Example:
<startup>
    <add key="PingTXRADuringStartup" value="true" />
    <add key="FillCacheDuringStartup" value="true" />
    <add key="SubmitClientRequestAttributes" value="false" />
    <add key="FailoverConnectionCheckPeriodSeconds" value="9"/>
    <add key="NetBiosName" value="KEYON"/>
<add key="SanValueDomainFQDN " value="keyon.net"/>
</startup>
- Set RPC settings The TXRADCOM service also supports the RPC interface. The hostname and the port for the RPC host can be set here.
- RpcHostname is the hostname for the RPC host. If not defined, the FQDN of the local server is used.
- RpcEndpointPort is the RPC port, if not defined, the RPC ports are negotiated between client and server.
<rpc>
    <add key="RpcHostname" value="" />
    <add key="RpcEndpointPort" value="" />
</rpc>
- Change TXRADCOM Cache Configuration The TXRADCOM service uses caching for better performance. It can be specified how long the cached objects remain in the cache. Currently the following objects are cached:
- CA certificate
- CA information data
- CA Exchange certificate
- CA base CRL
- CA ping result
- Registered AD groups from the TXRA
It makes sense to enable cache expiration: In case the RA was not reachable on startup and no CA info (AD groups/Cert Profiles/…) could be loaded, this gets reloaded after cache expiration. Example:
<cache>
    <add key="AbsoluteExpirationSecCAInfo" value="28800" />
    <!-- AbsoluteExpirationSec for Ping -->
    <add key="AbsoluteExpirationSecPing" value="28800" />
    <!-- AbsoluteExpirationSec for Base CRLs in seconds -->
    <add key="AbsoluteExpirationBaseCrl" value="14400" />
    <!-- AbsoluteExpirationSec for Base CRLs in seconds -->
    <add key="AbsoluteExpirationDeltaCrl" value="3600" />
</cache>
- Change CA Name Mapping Configuration The TXRA CA common name and CA server configuration string must be mapped to a primary target CA display Name on the TXRA. Note: This setting does not mean that the issuance of certificates is restricted to the configured CA only, the setting is only relevant for the ping request to TXRA which tries to connect to this primary CA. Example:
<caNameMapping>
<add key="DCOM TXRA CA1" value="TXRA CA1" />
</caNameMapping>
The key: DCOM TXRA CA1 is the registered name for the DCOM RA service (enrollment service in foreign domain). The value: TXRA CA1 is the display name of the CA in the TXRA configuration.
- Change TXAP WCCE web service URL Configuration
The following section specifies the SSL Client certificate for the DCOM Service account to be used.
<clientCertificate findValue="CN=tecra" storeLocation="LocalMachine"/>The following section specifies the True-Xtender RA WCCE web service URL.
<system.serviceModel>
<client>
    <endpoint name="WCCEService" address="https://raserver.fqdn/ws/WCCE.svc"
    binding="webHttpBinding" bindingConfiguration="webHttpBinding\_IWCCE"
    contract="WCCE.IWCCE" behaviorConfiguration="web" />
</client>
Failover configuration: Multiple client endpoints can be configured for different Registration Authority instances. Each of these RAs is required to have the same CA display names configured, as defined in "CA Name Mapping Configuration". The RA is required to support the same profile. The actual CA can be a different CA, as well as the certificate template. Each endpoint must have a unique name. On each connection check (period to be configured in "Startup Configuration", setting FailoverConnectionCheckPeriodSeconds), all endpoints will be checked for connectivity and the first working endpoint is used for RADCOM service. If an endpoint isn't reachable, the next endpoint from the list is tried. Default Endpoint: A default endpoint can be configured which has priority over all other configured endpoints, by configuring its name to contain the string "default". On every connection check, this endpoint will be checked first. Example:
<client>
<endpoint
name="WCCEService"
address="https://dev-blu.true-xtender.keyon.test/ws/WCCE.svc"
binding="webHttpBinding"
bindingConfiguration="webHttpBinding\_IWCCE"
contract="WCCE.IWCCE"
behaviorConfiguration="web" />
<endpoint
name="WCCEServiceFailover"
address="https://dev-blu2.true-xtender.keyon.test/ws/WCCE.svc"
binding="webHttpBinding"
bindingConfiguration="webHttpBinding\_IWCCE"
contract="WCCE.IWCCE"
behaviorConfiguration="web" />
</client>
Example with default endpoint:
<client>
<endpoint
name="WCCEServiceDefault"
address="https://dev-blu.true-xtender.keyon.test/ws/WCCE.svc"
binding="webHttpBinding"
bindingConfiguration="webHttpBinding\_IWCCE"
contract="WCCE.IWCCE"
behaviorConfiguration="web" />
<endpoint
name="WCCEServiceFailover"
address="https://dev-blu2.true-xtender.keyon.test/ws/WCCE.svc"
binding="webHttpBinding"
bindingConfiguration="webHttpBinding\_IWCCE"
contract="WCCE.IWCCE"
behaviorConfiguration="web" />
</client>
Set DCOM Permissions
Perform the following steps on the TXRADCOM server.
-
Set DCOM permissions | Execute the PowerShell script
C:\\Program Files\\keyon\\trueXtenderRADCOM\\scripts\\Configure-RADCOMLocalPermissions.ps1with Administrator privileges. This configuration script performs the steps as described in appendix 6.2 TXRADCOM Local Permissions Configuration Script -
Reboot Reboot the server
Configuration of ADCS CA
Note: In a cross-forest scenario, the steps below are not required. If the RA-DCOM Service is running in the same domain as the Registration Authority, perform the following steps. On the CA behind the True-Xtender RA perform the following steps.
-
Assign Template Assign the certificate template created in section Create AD Certificate Templates to the CA.
-
Set CA Permissions Remove "Request Certificates" permission on the CA for the TXRADCOM Client AD Group created in section 3.4.6.2. Note: Otherwise, both CAs, the TXRA-internal CA plus the MSCA are shown when requesting a certificate via DCOM enrollment, e.g. in an MMC. Autoenrollment would not properly work.
Verify TXRADCOM Service Functionality
TXRADCOM Service Availability
Perform the following steps to check if the TXRADCOM Enrollment Service is available.
- True-Xtender TXRADCOM
Open a command prompt and type the command
certutilThis command lists all the registered CA’s. In a second step, ping the RA DCOM with the following command:certutil –config <ca config string from above output> –pingOutput must be:
Connecting to <ca config string from above output> ...
Server "<ca server name>" ICertRequest2 interface is alive (140ms)
CertUtil: -ping command completed successfully.
Troubleshooting
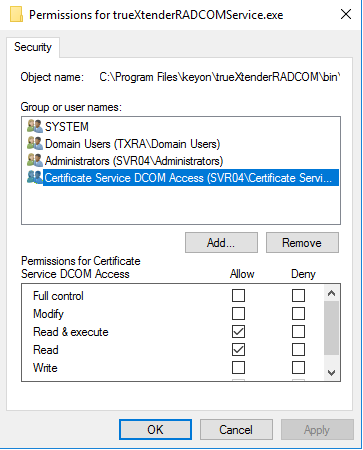
True-Xtender RA-DCOM File permissions
Check that the local group “Certificate Service DCOM Access” has “Read & execute” permissions on the file C:\\Program Files\\keyon\\trueXtenderRADCOM\\bin\\trueXtenderRADCOMService.exe.
Certificate Service DCOM Access
Check that “Authenticated Users” group is member of the local group “Certificate Service DCOM Access” on the server, where the RA-DCOM service is installed.
True-Xtender RA Log
Please see the TXAP admin guide [TXAPAdm] for where to find the True-Xtender RA Log data. You may want to set the Debug Log level.
Log configuration default path:
C:\\inetpub\\pkiservices\\RegistrationAuthority3\\WebApplication\\Log.config Debug log default path: C:\inetpub\pkiservices\RegistrationAuthority3\Logs\debug.log`
TXRADCOM Log
The TXRADCOM service writes a local log file as documented in section 3.4.8 Configure TXRADCOM Service. You may want to set the Debug Log level.
How to Debug DCOM
To analyze issues, DCOM debugging can be enabled on the TXRADCOM Server. To turn on DCOM error logging, follow these steps (for more information, see Microsoft documentation).
- Open Registry Editor
- Locate the HKEY_LOCAL_MACHINE\SOFTWARE\Microsoft\Ole registry subkey
- Right-click the Ole value, point to New, and then click DWORD Value.
- Type ActivationFailureLoggingLevel, and then press ENTER. Double-click ActivationFailureLoggingLevel, type 1 in the Value data box, and then click OK.
- Right-click the Ole value, point to New, and then click DWORD Value.
- Type CallFailureLoggingLevel, and then press ENTER. Double-click CallFailureLoggingLevel, type 1 in the Value data box, and then click OK.
- Restart the DCOM program, and then examine the System log and the Application log for DCOM errors.
- The error messages in the event log contain information that you can use to help resolve the issue.
- You can turn off DCOM error logging by changing the “ActivationFailureLoggingLevel” value and the “CallFailureLoggingLevel” value to zero.
Certificate Enrollment Troubleshooting
- DCOM is not configured correctly:
Description
Certificate enrollment fails with the following dialog:
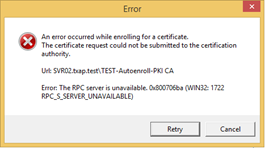 Reason(s)
One reason could be that DCOM isn’t configured correctly. With DCOM debugging enabled, the following entry could be found:Event Log: SystemEvent Log Source: DistributedDCOMEvent Log Level: ErrorEvent Log ID: 10016Event Log Example message:The machine-default permission settings do not grant Remote Activation permission for the COM Server application with CLSID {D99E6E74-FC88-11D0-B498-00A0C90312F3} and APPID {D99E6E74-FC88-11D0-B498-00A0C90312F3} to the user TXAP\user5 SID (S-1-5-21-4110698718-1165005322-4220665322-1119) from address 10.20.13.204 running in the application container Unavailable SID (Unavailable). This security permission can be modified using the Component Services administrative tool.
Solution
Whenever the TXRADCOM service is re-installed, proceed according to section 3.4.9 Set DCOM Permissions to reset the DCOM permissions.
Reason(s)
One reason could be that DCOM isn’t configured correctly. With DCOM debugging enabled, the following entry could be found:Event Log: SystemEvent Log Source: DistributedDCOMEvent Log Level: ErrorEvent Log ID: 10016Event Log Example message:The machine-default permission settings do not grant Remote Activation permission for the COM Server application with CLSID {D99E6E74-FC88-11D0-B498-00A0C90312F3} and APPID {D99E6E74-FC88-11D0-B498-00A0C90312F3} to the user TXAP\user5 SID (S-1-5-21-4110698718-1165005322-4220665322-1119) from address 10.20.13.204 running in the application container Unavailable SID (Unavailable). This security permission can be modified using the Component Services administrative tool.
Solution
Whenever the TXRADCOM service is re-installed, proceed according to section 3.4.9 Set DCOM Permissions to reset the DCOM permissions. - Access to any CA is broken with “The RPC server is unavailable”
Description If TXRADCOM is installed without further configuration, access to other CAs from this server will fail with “The RPC server is unavailable” error.certutil -config "<CaConfigString>" -pingConnecting to <CaConfigString> ...Server could not be reached: The RPC server is unavailable. 0x800706ba (WIN32: 1722 RPC_S_SERVER_UNAVAILABLE) -- (0ms)CertUtil: -ping command FAILED: 0x800706ba (WIN32: 1722 RPC_S_SERVER_UNAVAILABLE)CertUtil: The RPC server is unavailable. Reason(s) One reason could be that DCOM isn’t configured correctly Solution Make sure DCOM permissions are set correctly according to sections 3.4.9 and 4.2 and reboot the server |
Service and DCOM Config missing
In case the Windows Service " true-Xtender Registration Authority DCOM" or the DCOM config " trueXtenderRADCOM" is not installed after execution of the installer: If there is a GPO (Group Policy Object) restricting the execution of scripts (e.g. "AllSigned" execution policy), the digital certificate of the installer signature must be present in the Trusted Publishers for the Installer execution to succeed. This can be achieved by the following instructions: In Windows Explorer, select properties of the installer file true-XtenderRADCOM_*.*.*.exe and switch to tab "Digital Signatures". Select the Signer, click "Details" - "View Certificate" - "Install Certificate…". Select "Local Machine", click "Next", select "Place all certificates in the following store". Click "Browse", select "Trusted Publishers", click OK - "Next" - "Finish".
Authentication Failure due to missing strong certificate mapping
If authentication fails and the Domain Controller in charge logs event 39 from source Kdcsvc in the System log with event text below, refer to Certificate Based Domain Authentication Guide.
The Key Distribution Center (KDC) encountered a user certificate that was valid but could not be mapped to a user in a strong way (such as via explicit mapping, key trust mapping, or a SID). Such certificates should either be replaced or mapped directly to the user through explicit mapping. See https://go.microsoft.com/fwlink/?linkid=2189925 to learn more.
User: <principal name>
Certificate Subject: <Subject name in Certificate>
Certificate Issuer: <Issuer Fully Qualified Domain Name (FQDN)>
Certificate Serial Number: <Serial Number of Certificate>
Certificate Thumbprint: <Thumbprint of Certificate>
Check this link for details: https://support.microsoft.com/en-us/topic/kb5014754-certificate-based-authentication-changes-on-windows-domain-controllers-ad2c23b0-15d8-4340-a468-4d4f3b188f16#bkmk_kdcregkey
Release History
Release 3.11
- Improved Setup scripts
- setup sets service to start mode automatic.
Release 3.10
Autoenrollment scenario: Requesting account is first searched in local domain, if not found it is searched in GC of local domain, if not found and request is providing CDC request attribute, it is searched in CDC domain.
Release 3.9
- **Improved account AD group handling
Breaking change
**This release resolves an issue with AD groups, roles, assigned permissions and certificate profiles.Make sure the AD group configured for certificate recipients is assigned to a role that has “Access RA DCOM” permission and is assigned to the appropriate certificate profiles. Refer to section 3.3.4 Configure RA Role and AD Groups. Typical error in RADCOM logs if this is not set:
The permission to requests certificates of certificate profile KeyonMACComputer2 for user TXRA\SVR03$ is missing. - Improved setup scripts: A script was added which sets the required DCOM permissions (replacing manual configuration).
- Support for auto-enrollment from local machine (RA-DCOM server itself)
Release 3.8.3
Setting SanValueDomainFQDN has been changed from single value to semi colon list of values. Setting DcSanDnsForAny was introduced for testing purposes.
Release 3.8.2
Adhering to true-Xtender Registration Authority versioning.
**Support for SID extension
**RADCOM fetches the requesters Object SID from it's AD account and submits it along with further request attributes to the RA. Depending on RA certificate profile configuration, the SID is submitted as request attribute to the CA.
**Support for CEP (Certificate Enrollment Policy Service)
**CEP reads permissions from the Enrollment Service (in sync with ADCS CA permissions). A recipient account needs to have "Request Certificates" permissions on the CA. The Setup Script for RADCOM sets these permissions by default for "Authenticated Users".
Support for CES (Certificate Enrollment Service) forwarded requests
RADCOM supports requests forwarded from CES (request attributes needed to be trimmed to remove non-valued elements).
Release 1.3.8
Added NetBiosName and SanValueDomainFQDN There are two new configuration parameters “NetBiosName” and “SanValueDomainFQDN”. They can be used to add additional SAN DNS values to the request if the requesting identity is a domain controller. Added Failover Functionality With the failover functionality, multiple true-Xtender Registration Authority endpoints can be configured, in case RA endpoint is not reachable, another will be used. If a default endpoint is configured, the RADCOM Service tries to connect back to this endpoint as soon as it is reachable. Without default endpoint, the endpoint will be used as long as it works. Each of these RA instances is required to have the same CA display names configured, as defined in "CA Name Mapping Configuration". The RA is required to support the same profile. The actual CA can be a different CA, same applies for the certificate template. The appropriate CA trust stores must be configured on the client systems.
Release 1.3.7
Fix CheckAdGroupMembership Caching Some identity references could not be translated to their corresponding AD Group (for example if the old domain is no longer active) which would interrupt the AD Group translation completely. These errors are now properly handled.
Release 1.3.6
Improved internal cache update mechanism Setting the configuration property “AbsoluteExpirationSecCAInfo” to a value higher than 0 has led to problems in issuing and revoking certificates. This has been fixed.
Appendix
TXRADCOM Enrollment Service Configuration Script
The script DCOM\Configure-RADCOMEnrollmentService.ps1 executes the following steps:
- It adds the local group "NT AUTHORITY\Authenticated Users" to the local Group "Certificate Services DCOM Access"
- It creates an Enrollment Service object in AD with the following attributes
- object type: "pkiEnrollmentService"
- cn: “<TXRA-Internal-CA-Subject-CN>”
- distinguishedName: "CN=<TXAP-Internal-CA-Subject-CN>,CN=Enrollment Services,CN=Public Key Services,CN=Services,CN=Configuration,DC=...,DC=..."
- cACertificate: Binary X509 certificate of <TXAP-Internal-CA>
- cACertificateDN: Subject DN of X509 certificate of <TXAP-Internal-CA>
- certificateTemplates: “<list of AD template names>”
- displayName: "<TXAP-Internal-CA-Subject-CN>"
- dNSHostname: "<TXRADCOM-Hostname>"
- flags: "10"
- It sets special permissions "Request Certificate" for "Authenticated Users" (same as on a ADCS CA) to make Certificate Enrollment Policy Service (CEP) properly provide templates in policy.
TXRADCOM Local Permissions Configuration Script
The script DCOM\Configure-RADCOMLocalPermissions.ps1 executes the following steps:
- It adds Certificate Service DCOM Access with Local Activation and Remote Activation permissions to DCOM My Computer Launch and Activation Permissions
- It grants LocalActivation,RemoteActivation Launch permissions for Everyone
- It grants LocalAccess,RemoteAccess Access permissions for Everyone.
Manual steps:
| Task | Description |
|---|---|
| Set DCOMMy ComputerPermissions | Start "Component Services"Select "Properties" on "My Computer"Select tab "COM Security"In area "Launch and Activation Permissions", select "Edit Limits..."Add local group "Certificate Service DCOM Access" and grant "Local Activation" and "Remote Activation" permissions |
| Set DCOMServicePermissions | Go to folder "My Computer" - "DCOM Config" andselect service "trueXtenderRADCOM"Select “Properties” and go to tab "Security"In area "Launch and Activation Permissions", select "Customize" and click "Edit..."Remove all groupsAdd group "Everyone" and grant "Local Activation" and "Remote Activation" permissions |
| Set DCOMServicePermissions | In area "Access Permissions", select "Customize" and click "Edit..."Remove all groupsAdd group "Everyone" and grant "Local Access" and "Remote Access" permissions |